My sewing machine has been going non-stop this week. It started when my son's nursery had a pirate theme for the week. The children were encouraged to bring in pirate things, and as he didn't really have any, I decided to make him a quick eye patch. I took a piece of black felt, and some pirate print that I had in my stash. Cut out a skull and crossbones from the pattern (I'd been thinking about cutting out my own applique but frankly, 3 1/2 year olds don't appreciate the fine art of applique) and stuck it onto the felt with bondaweb (I didn't even finish the edges. Bad mummy!). Then, I made a little tube with black cotton fabric, threaded a piece of elastic through, and attached both ends to the felt patch. Ta da!
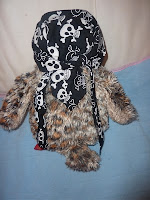
I was feeling quite pleased with myself (and I would show you a photo, except that son has hidden the eye patch somewhere in the flat and for the life of me I can't find it). But then, the rest of the nursery children upped the game and the next day he came home wanting a pirate hat, like his best friend from across the street had.
 |
| Pirate hat, kindly modelled by Wol. |
 |
| Pirate pieces, ready to be sewn |
Then, for the band that goes around the front and acts as a tie, rather than making a tube and turning it inside out (I HATE doing that), I simply pressed my long piece in half and pinned it along the cap with the rough ends lining up. I then sewed along, and pressed it down flat. When I came to the ties, I pressed the edges in a bit and then sewed over top, tucking the ends in. In the end, I got this. It fit perfectly, and my son was thrilled. Alas, pirate theme is over now and goodness knows what I'll have to make next...
 |
| Cap shape sewn, before the band is added to the bottom |
 |
| Ta-da! |
But more fun than pirate hats: I've been making travel bags for the kids. These will be stuffed with stickers, crayons and so on to keep them occupied on an upcoming long trip. I found this tutorial ages ago, but only just decided to make it - and it really is as easy as she says it is! The longest part was ironing on the interfacing. Once that was done, it only took minutes to put together. I added a snap instead of velcro, but otherwise followed the pattern exactly.
I LOVE these, and want to make them for everyone I know. A few things I'll do differently next time, though: I would add a loop on the top for hanging them on a hook, and possibly a side pocket.
The ladybirds are for my daughter (1 1/2), and I made it exactly the size of the pattern. The turtles are my son's, and I enlarged the pattern by about an inch on all sides so that I could fit all his many bits and pieces into it. They are super easy and super lovely - give them a try!


No comments:
Post a Comment