Showing posts with label how to quilt. Show all posts

Tuesday, 17 April 2012

'Easy' Quilts

In the last few weeks, a couple of friends have asked me about making their first quilt. Is it complicated? Is it going to be too advanced for their sewing? And how long will it take?

They don't tend to believe me when I tell them that a quilt is only as hard as you make it. Most people think of a quilt as lots of little squares sewn together and yes, that kind of quilt can take a while. But a quilt top can really be quite simple and still be very effective.

This is a quilt I made from a single piece of flannel with appliqued flowers and birds. Didn't take too long to make, although (as with most quilts) the most time consuming part was the cutting out.

The principles of this 'quilt in an hour' can be applied to any fabric, and you can make a quilt with just single pieces of fabric for the front and the back. For these, more elaborate quilting can really make the quilt something impressive - but elaborate quilting is beyond me!

I recently saw a quilt that was simply a plain white piece of fabric and a contrasting backing. What made it special was that the quilter had used a huge variety of stitches and threads to quilt an elaborate bird on the fabric, and thus turn a plain piece of cloth into an amazing quilt.

A quilt is really just a sandwich of layers: top, wadding, and backing. It doesn't have to be squares, and it doesn't have to take months. A few examples:

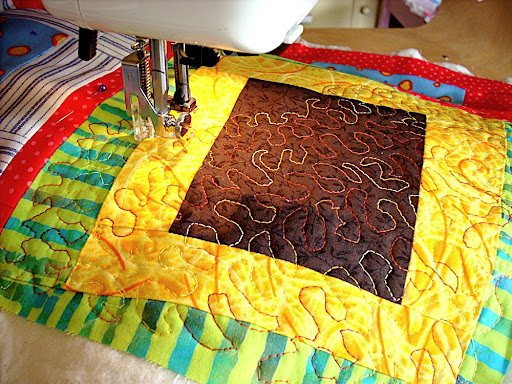
This is the quilt I made last week. I started on Monday night, and finished it on Wednesday. The actual quilt top construction took a few hours; the rest was the binding. It was made with fabric from Africa, bought and given to me by my mother-in-law, and the quilt was a gift for her.


To make it, I simply cut strips of the dark blue fabric and strips of the same width from the unbleached cotton. I varied the width of the strips so they ranged from about 4-10 inches. Then, I joined them together at an angle, again varying the length of the blue pieces. I wanted to bring out the green in the blue pattern, so I appliqued the green rectangles over top of the strips once they'd been sewn together. It was backed with another yellow fabric she'd given me, and I used the green for the binding. Simple simple, but it looks smart!

Try buying 20cm strips of 6-8 different, complementary fabrics and sewing them together for a super easy baby quilt - have a look at this blog for inspiration! Make your quilting as simple or as complicated as you can handle, finish off the edges, and you're done. It looks like a serious amount of work, and no one has to know that it wasn't.

And finally, if you're new to quilting, you can have a look back at this post which will cover the basics of it all. So don't be intimidated by quilts. It's really just a sandwich. And anyone can make a sandwich!

Friday, 12 August 2011

ABCs of Sewing: Q is for Quilting

I've decided to go out of order here. If you'd been paying attention, you might think that the next letter coming was D (which will be for darning, if I ever get to it). But this morning, a friend in need berated me for not actually explaining what a quilt entailed. All apologies. And just for you, Julie (since every other reader of this blog seems to be here just for the Octonauts things - not joking. Well over half of my all time readers...), here are the ABCs of quilting.

A Definition

First: what is a quilt? Well, it's a sandwich of fabrics consisting of a top layer (quilt top), middle layer (wadding, or sometimes batting), and bottom layer (backing). It's usually finished with binding. The whole things makes a blanket which is viewable from both sides, so unlike most things you sew there is no 'wrong' side in the finished project.

Quilting

Now there are quilts, and there is quilting. The above is a Quilt. Quilting, though, is the little stitches that you put through all three layers. These stitches are both decorative and functional. They hold the quilt layers together, but you also use them to enhance, to outline, and to decorate.

'In the ditch' quilting
Patchwork squares, outlined, seen from the back
For example. You might have a quilt made up of patchwork squares, all different patterns. When it comes to quilting, you might decide to quilt around the squares (this is called 'in the ditch', and means you sew in the seams that are already there).

You may decide to go diagonally across the squares, creating another layer of pattern. Or, you might decide to create an entirely new pattern on top of your squares by stitching stars, hearts, flowers, and so on.

Or, you could decide to sew a random pattern of squiggles, or stippling, using free motion quilting.
Stippling
You might also use quilting to outline an existing pattern, if, hypothetically (Julie), you bought a printed panel with fairies, hungry caterpillars, or monkeys. You could then sew around certain lines to emphasise them.

You can quilt by hand, or machine. Just make sure you buy the appropriate thread.

Quilting supplies

The following will be useful for your quilting life. There is a whole, large market devoted to quilting. In Edinburgh, I recommend Mandors. Online, try The Cotton Patch, or eBay
  • a rotary mat, and cutter 
  • a quilting ruler (go for a longish one, rather than a square) 
  • quilting safety pins, to baste, or hold your layers together, while you quilt 
  • quilting needles, either for your sewing machine or for hand quilting 
  • an iron 
  • 100% cotton thread
Rules for Making a Quilt

When it comes to making a quilt, really anything goes - but there are a few rules that will make your life easier. 
  1. Always use 100% cotton thread. Over time (and we are talking a long time, but if you're making a quilt you are making an heirloom piece), other threads can wear through the fabric. Cotton shouldn't. Use thread for hand or for machine as appropriate (hand quilting thread is usually coated to make it easier to work with).
  2. The standard seam allowance is 1/4 inch.
  3. Pre-wash and shrink your fabric.
  4. Stretchy fabric generally isn't used for quilts. It can be, but requires extra prep - namely, making it not stretchy. Use an iron-on stabiliser to do this.
  5. Use a good quality wadding. You want it to be thin! The first time I tried to quilt, I bought wadding that looked like a marshmallow. It would have been good for making a puffy jacket, or a gillet, but not for a blanket. Think like a layer of felt - that's about what you're going for.
This is just a very basic explanation to get you started, Jules (and anyone else, who stumbled over here from the Octonauts pages). There are many, many more pages on the web that can help you with specifics, like what kind of quilt top to make, and what quilting method to use. But I hope this can help you on the way to becoming a quilting addict!