I have a post in the works for the easiest Christmas decorations you can imagine (so easy that once I post it I won't be able to give them to anyone I know...) But in the meantime, I had to share this. I am SO VERY EXCITED about this new business/cafe/social enterprise that's opening just up the road!
http://www.sewingbeecafe.co.uk/
The Sewing Bee Cafe lets you hire a range of machines by the hour. They even have a knitting machine! Once they get up and running properly (Wednesday), there will be a lovely cutting table, various sewing experts on hand, and...A QUILTING MACHINE! I cannot wait to break that baby in.
The lady who's running it seems just lovely, and very open to ideas. You can hire the place our for a workshop or a 'sewcial' party, or pop in for the very child-friendly opening hours of 1-8 30pm.
Excited!!!!
Monday, 28 November 2011
Thursday, 10 November 2011
Still here!
I'm still here! I haven't forgotten about my blog. But it's been, well...BUSY. We went to Canada, and came back from Canada (total of 21 hours of flying and an 8 hour time difference = not so much fun). Things have been busy at Paying Work. And I've been sewing up a storm trying to get things made for my one and only craft fair of the year, this Saturday.
I have a not so good history with craft fairs. This will be my fourth. The first one, I sold £12. The table cost me £25. The second I sold nothing - again, the table was £25. The third I sold £16, so really not too bad. But not enough so that I could quit Paying Work and start up as an independent sewing type. I swore no more craft fairs and yet when this one came along... I couldn't say no.
So wish me luck for Saturday. Photos to come after the event. And in the meantime, does anyone have any brilliant ideas of little things that can be made for Christmas presents for the lovely ladies who work at the childrens' nursery? I'm stumped.
Monday, 19 September 2011
Pirates and Planes
My sewing machine has been going non-stop this week. It started when my son's nursery had a pirate theme for the week. The children were encouraged to bring in pirate things, and as he didn't really have any, I decided to make him a quick eye patch. I took a piece of black felt, and some pirate print that I had in my stash. Cut out a skull and crossbones from the pattern (I'd been thinking about cutting out my own applique but frankly, 3 1/2 year olds don't appreciate the fine art of applique) and stuck it onto the felt with bondaweb (I didn't even finish the edges. Bad mummy!). Then, I made a little tube with black cotton fabric, threaded a piece of elastic through, and attached both ends to the felt patch. Ta da!
I was feeling quite pleased with myself (and I would show you a photo, except that son has hidden the eye patch somewhere in the flat and for the life of me I can't find it). But then, the rest of the nursery children upped the game and the next day he came home wanting a pirate hat, like his best friend from across the street had.
 |
| Pirate hat, kindly modelled by Wol. |
 |
| Pirate pieces, ready to be sewn |
Then, for the band that goes around the front and acts as a tie, rather than making a tube and turning it inside out (I HATE doing that), I simply pressed my long piece in half and pinned it along the cap with the rough ends lining up. I then sewed along, and pressed it down flat. When I came to the ties, I pressed the edges in a bit and then sewed over top, tucking the ends in. In the end, I got this. It fit perfectly, and my son was thrilled. Alas, pirate theme is over now and goodness knows what I'll have to make next...
 |
| Cap shape sewn, before the band is added to the bottom |
 |
| Ta-da! |
But more fun than pirate hats: I've been making travel bags for the kids. These will be stuffed with stickers, crayons and so on to keep them occupied on an upcoming long trip. I found this tutorial ages ago, but only just decided to make it - and it really is as easy as she says it is! The longest part was ironing on the interfacing. Once that was done, it only took minutes to put together. I added a snap instead of velcro, but otherwise followed the pattern exactly.

I LOVE these, and want to make them for everyone I know. A few things I'll do differently next time, though: I would add a loop on the top for hanging them on a hook, and possibly a side pocket.

The ladybirds are for my daughter (1 1/2), and I made it exactly the size of the pattern. The turtles are my son's, and I enlarged the pattern by about an inch on all sides so that I could fit all his many bits and pieces into it. They are super easy and super lovely - give them a try!
Friday, 9 September 2011
Superhero Capes (with extra toddler safety!)
 |
| Me, age 2, as a Superman ballerina |
Yesterday, my children decided to be superheroes. I don't know where this game came from, because as far as I knew they didn't know what superheroes were, but since my son's interpretation involved running around with a bath towel yelling, "To infinity and beyond!" I'm guessing it might have something to do with Toy Story. The bath towel bit, well, it shows creativity, right?
Anyway, after watching his little sister run about with a towel wrapped around her head, completely obscuring her vision, I decided they deserved proper capes. After all, I had a Superman cape when I was wee. Sure, I used it as a ballerina tutu... But it was a cape sometimes, I'm sure.
Capes are pretty easy. I'm sure you don't need me to tell you how to sew one. But I'm always a bit uncomfortable about tying things around my children's necks. Not that they can't be trusted but...well, they can't be trusted. So I thought long and hard about how I might make a baby-safe(r) version for them. I originally decided I would elasticise the whole neck and close it with a piece of velcro, which would have the added bonus that they could do it themselves. But alas, no velcro to be found at 11pm. So I went with this compromise: the neck is partially elasticated, so as to give enough to keep them safe, no matter how rough and tumble their superhero play gets. It can be made within half an hour.

You will need:
- fabric - how much depends on the size of your child and how full you want your cape. These were each made with about a fat quarter worth of fabric.
- elastic
- bondaweb and a contrasting fabric for letters, if desired
- sewing machine and iron
Step 1: cutting out
This is a very rough project. It's not a finished work of art; it's a play piece. And so, I didn't take much time or care in my measurements. I measured the back of each of their shirts and added roughly 5 inches. For my son (3), I made a 20 inch square; for my daughter (1 1/2) I made a 16 inch square.
 |
| Fabric square, folded in half and trimmed... |
Then, I folded the squares in half and cut the edge at a slight angle, to give the piece a bit of a triangle shape with a nice, flat top.
 |
| ...to give this shape |
Step 2: hemming
Now fold and press the top and bottom edge of your cape, then fold it over and press again to give a nice finished look. Hem the top and bottom, and then do the same for the sides. (I was using really horrible cheap polyester fabric that I happened to have in my stash and it frayed like mad. If you were using something nicer, you could probably get away with just folding it over the once and hemming.)

Once all the edges are finished, turn the top part over about 1.5 inches (more if your elastic is wider) and press. This will be the casing for your ties to pass through.
 |
| Finished edges, with the top pressed down |
Now cut two strips of your fabric, 2 inches wide and the length that you would like your finished ties to be. Fold each of the long edges in towards the middle of the rectangle and press. Then fold the strip in half, press again, and sew so that you have a nice, finished tie.
 |
| Both edges pressed in, before it is folded in half and pressed again. |
Take your elastic, and cut a piece about 2/3 the length of the top of your cape. Sew each end of the elastic to one of your ties with a few rows of secure stitches, so that you have a long tie that with the section of elastic in the middle, like so:

Step 4: attaching the tie
Now, pin your tie in place so that it tucks underneath the fold you made for the casing, and the start of the elastic lines up with the right hand edge of the cape. That sounds a bit confusing. Maybe a picture will help.


Step 5: Superhero adornments
Because it was 11pm, I just cut out son's and daughter's intial and attached them to the cape with bondaweb. I didn't even sew around the edges to secure them. Of course, lots more care can be taken with this step, designing a crest for your child, working in multiple colours, and so on. But like I say, it was 11. I wanted bed.

Things I might change next time around: the fabric. I hate nasty polyester, and I really fancied a nice dark blue for the capes. And I do like the idea of the neck attaching by velcro, which would be even safer and easy enough for the child to do it by him or herself. Also, I think my son would have liked a fuller version, so that it swooped and he could hold the edges out. But they will do. And it was awfully cute watching them eat their pancakes this morning in their pyjamas and capes.
Friday, 12 August 2011
ABCs of Sewing: Q is for Quilting
I've decided to go out of order here. If you'd been paying attention, you might think that the next letter coming was D (which will be for darning, if I ever get to it). But this morning, a friend in need berated me for not actually explaining what a quilt entailed. All apologies. And just for you, Julie (since every other reader of this blog seems to be here just for the Octonauts things - not joking. Well over half of my all time readers...), here are the ABCs of quilting.
First: what is a quilt? Well, it's a sandwich of fabrics consisting of a top layer (quilt top), middle layer (wadding, or sometimes batting), and bottom layer (backing). It's usually finished with binding. The whole things makes a blanket which is viewable from both sides, so unlike most things you sew there is no 'wrong' side in the finished project.
Now there are quilts, and there is quilting. The above is a Quilt. Quilting, though, is the little stitches that you put through all three layers. These stitches are both decorative and functional. They hold the quilt layers together, but you also use them to enhance, to outline, and to decorate.
For example. You might have a quilt made up of patchwork squares, all different patterns. When it comes to quilting, you might decide to quilt around the squares (this is called 'in the ditch', and means you sew in the seams that are already there).
You may decide to go diagonally across the squares, creating another layer of pattern. Or, you might decide to create an entirely new pattern on top of your squares by stitching stars, hearts, flowers, and so on.

Or, you could decide to sew a random pattern of squiggles, or stippling, using free motion quilting.
You might also use quilting to outline an existing pattern, if, hypothetically (Julie), you bought a printed panel with fairies, hungry caterpillars, or monkeys. You could then sew around certain lines to emphasise them.
A Definition
Quilting
 |
| 'In the ditch' quilting |
| Patchwork squares, outlined, seen from the back |
You may decide to go diagonally across the squares, creating another layer of pattern. Or, you might decide to create an entirely new pattern on top of your squares by stitching stars, hearts, flowers, and so on.
Or, you could decide to sew a random pattern of squiggles, or stippling, using free motion quilting.
 |
| Stippling |
You can quilt by hand, or machine. Just make sure you buy the appropriate thread.
Quilting supplies
The following will be useful for your quilting life. There is a whole, large market devoted to quilting. In Edinburgh, I recommend Mandors. Online, try The Cotton Patch, or eBay.
- a rotary mat, and cutter
- a quilting ruler (go for a longish one, rather than a square)
- quilting safety pins, to baste, or hold your layers together, while you quilt
- quilting needles, either for your sewing machine or for hand quilting
- an iron
- 100% cotton thread
Rules for Making a Quilt
When it comes to making a quilt, really anything goes - but there are a few rules that will make your life easier.
- Always use 100% cotton thread. Over time (and we are talking a long time, but if you're making a quilt you are making an heirloom piece), other threads can wear through the fabric. Cotton shouldn't. Use thread for hand or for machine as appropriate (hand quilting thread is usually coated to make it easier to work with).
- The standard seam allowance is 1/4 inch.
- Pre-wash and shrink your fabric.
- Stretchy fabric generally isn't used for quilts. It can be, but requires extra prep - namely, making it not stretchy. Use an iron-on stabiliser to do this.
- Use a good quality wadding. You want it to be thin! The first time I tried to quilt, I bought wadding that looked like a marshmallow. It would have been good for making a puffy jacket, or a gillet, but not for a blanket. Think like a layer of felt - that's about what you're going for.
This is just a very basic explanation to get you started, Jules (and anyone else, who stumbled over here from the Octonauts pages). There are many, many more pages on the web that can help you with specifics, like what kind of quilt top to make, and what quilting method to use. But I hope this can help you on the way to becoming a quilting addict!
Thursday, 4 August 2011
A quick catch up.
It's been a bit quiet on the blogging front. I've been finishing old projects and working on lots and lots of presents. I feel a bit funny blogging tutorials for things I've made as presents, but I'm more than happy to answer questions if anyone wants to try any of the below!
So, here's a quick run through of the last few weeks in photos, and not so much a tutorial as an idea shared for a baby shower present you can make.
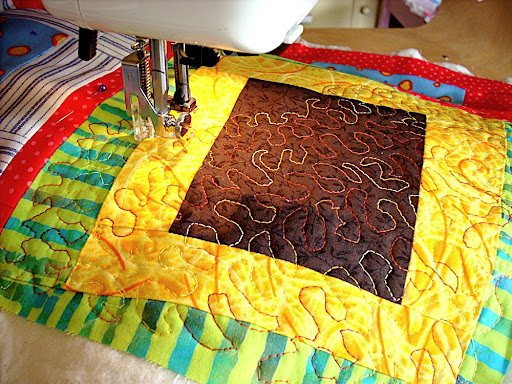
First up, this top secret present has now been posted, received, and is therefore safe to share. Made for a very good friend's baby, said baby had the nerve to show up 5 weeks early, thus throwing all my plans to have this there for his arrival! It was quite a basic quilt top, but then I decided to try my hand at free motion quilting. Definitely not as easy as I'd hoped it would be. Quilting this thing took...a very long time. And many, many broken needles. By the end, though, I was barely breaking any (as opposed to the first few inches which used up 7 in the space of half an hour).
I love this quilt - simple, bright colours, and the backing is possibly my favourite fabric ever. I may well make this again, but there are a few things I'd do differently...

Next up, we have a project that was born out of a baby shower. We wanted to make a collaborative present for the (second time) mum-to-be, and I'd originally thought this would be a blanket. I asked everyone at the shower to draw a wee picture, and was going to turn them into appliques for a fleece blanket. However, the designs didn't really lend themselves to one blanket scene, so I then thought it would have to be a patchwork quilt. And then, the idea of a book hit me.
This one is made of unbleached cotton, and the appliques are as many different textures as I could find, from soft fleece to bumpy corduroy, to scratchy linen. I hope baby likes reading it as much as I liked making it.


And finally, a special request for a friend: a couple of rounds of name bunting, for a pair of sisters. I love making bunting.


More exciting (?!) tutorials to come but for now, I have to finish this last thing that's been keeping me busy. I call it the Quilt of Doom and really, that's a story for a whole other post...
So, here's a quick run through of the last few weeks in photos, and not so much a tutorial as an idea shared for a baby shower present you can make.
First up, this top secret present has now been posted, received, and is therefore safe to share. Made for a very good friend's baby, said baby had the nerve to show up 5 weeks early, thus throwing all my plans to have this there for his arrival! It was quite a basic quilt top, but then I decided to try my hand at free motion quilting. Definitely not as easy as I'd hoped it would be. Quilting this thing took...a very long time. And many, many broken needles. By the end, though, I was barely breaking any (as opposed to the first few inches which used up 7 in the space of half an hour).
I love this quilt - simple, bright colours, and the backing is possibly my favourite fabric ever. I may well make this again, but there are a few things I'd do differently...
 |
| Finished quilt |
 |
| Close up of the quilting |

 |
| Quilt backing |
 |
| The finished book |
This one is made of unbleached cotton, and the appliques are as many different textures as I could find, from soft fleece to bumpy corduroy, to scratchy linen. I hope baby likes reading it as much as I liked making it.
 |
| First pages |
 |
| Original drawing, and the resulting applique |
 |
| Giraffe! |
 |
| I was most proud of the cat's eyes |


And finally, a special request for a friend: a couple of rounds of name bunting, for a pair of sisters. I love making bunting.


More exciting (?!) tutorials to come but for now, I have to finish this last thing that's been keeping me busy. I call it the Quilt of Doom and really, that's a story for a whole other post...
Tuesday, 19 July 2011
Personalised t-shirt
My little girl loves to dance. She always has: her earliest nursery reports were of her bopping away to the music and clapping her hands. Now, at almost 18 months, she will happily dance on command or whenever she hears music. She twirls, spins, bounces, occasionally jumps, and is just the happiest wee creature you've ever seen.
 So this morning, I took it in my head that I wanted to make her a shirt. A wee dancer shirt. For those of you not familiar with Scottish phrases, I can refer you to various dictionaries of Scottish vernacular, which define "dancer" as a "term of glee or exultation. Tap dancer- three stairs up in a tenement or top floor in a prison (also called Fredastair or Freda)" - see also here. Basically, it's a good thing, and being called a "wee dancer" is a term of admiration and appreciation.
 And here is my little girl's Wee Dancer shirt. You don't need to make a wee dancer - the method could be used for anything. Try putting your wee one's name on it. Or how about a big number 1 for a first birthday?
You can, of course, make a t-shirt from scratch but frankly, why bother when you can buy a perfectly good one for £2? (This one's from H&M - £1.99, but you can also get multipacks of white onesies or t-shirts from places like John Lewis and Asda.)
Start to finish, this project took me exactly one hour.
Start to finish, this project took me exactly one hour.
You will need:
- one t-shirt, of an appropriate size
- bondaweb
- a small bit of fabric (or fabrics) in contrasting colours to make your letters
- an iron
- a good pair of scissors
- a printer, stencils, or a good hand at drawing letters
- a sewing machine (optional)
Step 1: make your letters
The easiest way to do this is to get onto your computer, type the word or words you want, and then fiddle with fonts and sizes until you have a pattern. I used 220 point Futura bold outline for mine. Try not to pick a font that's too fussy or narrow as you will have to cut out all those fiddly bits, and possibly sew them later on.
Once you've got your letters looking right, you need to print. If you can, print a mirror image of your words, so that they come out backwards (usually you can do this in your print settings). If you can't, don't worry - it's just a bit extra work.
Now, hold your printout up to your t-shirt to make sure the size looks right and it will all fit. If it looks good, go ahead and trace your letters onto your bondaweb. If you weren't able to print a mirror image, you can either cut them out and flip them over and then trace, or trace their outline onto the back of the printout and copy those. You should now have a sheet of bondaweb with your backwards letters on them.
Step 2: make the fabric letters
You now want to fuse the bondaweb onto the fabric you've chosen for your letters. Make sure you're doing it on the WRONG side of the fabric! Once you've ironed the bondaweb on, carefully cut out all the letters. Peel the paper backing off, arrange them on your t-shirt, and iron them into place. Your letters should now be the right way round!
Step 3: sewing
You can now, if you want, set your sewing machine to a very small, tight zigzag stitch and outline the letters in a complimentary or contrasting thread. This will ensure those letters aren't going anywhere, and can help the design pop out a bit. However, unless you're very very good (I'm not), you might also lose some of the sharpness of the letters. So, if you've used a fabric that isn't going to ravel or fray, or the t-shirt doesn't need to last an eternity, or you don't have a sewing machine, feel free to skip this step. Just make sure you've done a really thorough job of ironing the letters on.
And ta-da! You are finished! Easy as pie, and the t-shirt world's your oyster. Why not try and personalise a set of plain white sleepsuits for a new baby, with matching burp cloths? Or a little hat? Or a towel, or a bag...

Tuesday, 12 July 2011
10-minute Gift Bags
This project is born out of the fact that I never seem to have wrapping paper, or gift bags, when I need them. I had a good stash for while after the babies were born, but to be honest when you're looking for a classy little bag for a friend's birthday, "Congratulations! Baby Boy!" bags just don't do the trick.
What I lack in wrapping paper, though, I more than make up for in fabric scraps. I have - actually, I can't bring myself to admit how many tupperware boxes of fabric I am currently hoarding underneath my bed. It's a lot. And I am determined to start getting through them. I adore fabric. Fabric is my favourite part of sewing. Looking at the perfect, crisp, beautiful sheets of cotton, corduroy, fleece - it's my porn. And so far too often I end up buying 'just a metre' of this and that, not knowing what it will become, but knowing that I have to bring it home with me. And thus, I have XX boxes of fabric, waiting to be used.
So, put these two problems together and we come up with 10-minute Gift Bags. If you're a sewer, you won't need any further instructions. If you're new to the craft, here are a few to get you going. I made these by the dozen and filled them with homemade roasted nuts and truffles for the nursery staff at Christmas. I make them to put baby presents in. They work for any occasion, and can be as simple or elaborate as you desire.
You will need:
Step 1: Cut a rectangle
I can't really be more specific than that, because the size and shape will depend entirely on what you are wanting to wrap. The best thing to do is start by wrapping the fabric around the thing you want to wrap, add a centimetre or so, and mark. Then do the same with the height, making sure to leave enough fabric to gather around the top and the bottom, and add 3-5 centimetres on to that. Once you've got your dimensions, cut out so that you have a rectangle.
Step 2: Create a casing
Fold over the top edge of your fabric to create a casing for your ribbon or string to fit through. If you are using string, this can be quite narrow, but still needs to be wide enough for a safety pin to pass through. If you're using a thick ribbon, make it slightly wider. Fold, press or pin if desired, and then sew along the bottom to make a little tunnel.
Step 3: Sew up the bag
Fold your rectangle in half, right side in, with the casing along the top. Starting below the casing you've just sewn, sew down along the side of the bag and across the bottom. Turn the bag right way out.
Step 4: Thread the ribbon
Attach your safety pin to the end of the ribbon or string and pass it through one end of the casing. Using a wiggling method, work the ribbon around until it pops out the other end. Remove the pin, trim the ends, and voila! You have a drawstring bag, made in no time at all.

As always, you can make these more elaborate if you want by adding an applique initial or pattern, some lace or more ribbon, iron on emblems, or satin roses. Make larger versions in sturdy fabric to hold toys, laundry, or nappies. Make smaller versions in seasonal fabric, tie bells on the ends of the ribbons, and stuff with Christmas baking. Or fill with lavender for easy scented bags for your drawers.
 |
So, put these two problems together and we come up with 10-minute Gift Bags. If you're a sewer, you won't need any further instructions. If you're new to the craft, here are a few to get you going. I made these by the dozen and filled them with homemade roasted nuts and truffles for the nursery staff at Christmas. I make them to put baby presents in. They work for any occasion, and can be as simple or elaborate as you desire.
You will need:
- fabric (almost anything will work, but avoid fabrics that are very stiff, like felt)
- sewing machine and thread
- ribbon or string
- safety pin
- garnishes, if and as desired
Step 1: Cut a rectangle
 |
| (Apologies for the quality of photos in this post! For some reason they didn't turn out very well) |
I can't really be more specific than that, because the size and shape will depend entirely on what you are wanting to wrap. The best thing to do is start by wrapping the fabric around the thing you want to wrap, add a centimetre or so, and mark. Then do the same with the height, making sure to leave enough fabric to gather around the top and the bottom, and add 3-5 centimetres on to that. Once you've got your dimensions, cut out so that you have a rectangle.
Step 2: Create a casing
 |
| Casing, once sewn |
Step 3: Sew up the bag
Fold your rectangle in half, right side in, with the casing along the top. Starting below the casing you've just sewn, sew down along the side of the bag and across the bottom. Turn the bag right way out.
 |
| Bottom and side of the bag sewn up |
Step 4: Thread the ribbon
Attach your safety pin to the end of the ribbon or string and pass it through one end of the casing. Using a wiggling method, work the ribbon around until it pops out the other end. Remove the pin, trim the ends, and voila! You have a drawstring bag, made in no time at all.

As always, you can make these more elaborate if you want by adding an applique initial or pattern, some lace or more ribbon, iron on emblems, or satin roses. Make larger versions in sturdy fabric to hold toys, laundry, or nappies. Make smaller versions in seasonal fabric, tie bells on the ends of the ribbons, and stuff with Christmas baking. Or fill with lavender for easy scented bags for your drawers.
Monday, 4 July 2011
Quilt in an Hour (yes, really)
Now to be honest, this post should really be called 'quilt' in an hour. Technically, this is not a quilt. A real quilt is three layers: top, wadding, and backing. It's usually nicely edged with binding and finished by hand. It also takes substantially longer than an hour. However, if that's the kind of project you're looking for, read no further.

But for those of you who've not quilted before and want a little taster, or who need a quick and easy blanket, read on. This really is a 'quilt' you can make in an hour.
You will need:
Step 1: Get Ready
Line up your fabric and your fleece and pin together. You probably won't need to do much pinning as cotton and fleece tend to grip each other quite nicely.
Step 2: Quilt
Now, using your sewing machine, sew along the lines in the fabric to create the illusion of patchwork squares. Be careful to get right on the line, if you can, for the most authentic looking results.

Step 3: Finish the edges
Pin your binding around the edges. Slowly sew it in place. This can be trickier than it sounds, as you want your top and bottom to line up pretty exactly. If I were doing this again, I have to say I would probably add the binding in the traditional way and finish it by hand. But that would take a bit longer than an hour so...

And, you're done! A very serviceable, cozy quilted fleece, made in no time at all. And if you like this, there are lots of things you can do from here. Try using the patchwork fabric as a border around larger patchwork squares. Applique a name or a picture onto the fabric before you attach it to the fleece. Sew along the lines of the patchwork before attaching it to the fleece, and then try a more elaborate quilting pattern through the two layers. (Almost) instant (almost) quilts - definitely a winner.

But for those of you who've not quilted before and want a little taster, or who need a quick and easy blanket, read on. This really is a 'quilt' you can make in an hour.
You will need:
- fleece (I used 75 cm x 100 cm)
- patchwork fabric of the same size. I got this, but you can find more on eBay or in your local fabric shop
- thread
- bias binding. I bought pink cotton on eBay but you can use satin if you want. You don't want blanket binding, though, unless you want to finish it by hand.
- sewing machine
Step 1: Get Ready
Line up your fabric and your fleece and pin together. You probably won't need to do much pinning as cotton and fleece tend to grip each other quite nicely.
Step 2: Quilt
Now, using your sewing machine, sew along the lines in the fabric to create the illusion of patchwork squares. Be careful to get right on the line, if you can, for the most authentic looking results.

Step 3: Finish the edges
Pin your binding around the edges. Slowly sew it in place. This can be trickier than it sounds, as you want your top and bottom to line up pretty exactly. If I were doing this again, I have to say I would probably add the binding in the traditional way and finish it by hand. But that would take a bit longer than an hour so...

And, you're done! A very serviceable, cozy quilted fleece, made in no time at all. And if you like this, there are lots of things you can do from here. Try using the patchwork fabric as a border around larger patchwork squares. Applique a name or a picture onto the fabric before you attach it to the fleece. Sew along the lines of the patchwork before attaching it to the fleece, and then try a more elaborate quilting pattern through the two layers. (Almost) instant (almost) quilts - definitely a winner.
Friday, 24 June 2011
Octonauts Blanket Tutorial

So we have here the Octonauts blanket. Designed for my son's friend's 5th birthday, and now in the process of being replicated for both son and daughter who have, in their own ways, demanded one each. (He asks incessantly if it's finished yet, and she grabs the already completed one and lies on it while stroking Captain Barnacles' face.)

The process, for a change, involves applique. It's a bit time consuming, but certainly can be broken into nappable chunks. I can do one character per nap, and then another nap to sew them onto the blanket. Finish the edges of the blanket in one final nap, and this is probably 5 days worth of work.
You will need:
- Bondaweb, or an equivalent iron-on applique transfer material
- an iron
- a sewing machine
- fleece (I buy 1 metre of 150cm width and cut it in half, so I get two blankets for £6.99/metre)
- fabric in the following colours: black, white, light blue, medium blue, dark blue, orange, yellow, grey (tiny bit), pink (tiny bit)
- thread to match the above colours, plus some red and metallic silver
- a printer, access to a printer, or good drawing skills
 |
| Fabric Colours |
A note on fabrics: I use a mixture of cotton and felt. I go for felt for the smaller pieces, which I have to sew on by hand, as it doesn't fray. You could use all felt, but it gets quite thick as you're dealing with multiple layers.
Step 1: Print, trace, cut
Ah, the things we learned in school really were useful. This first step is all about a return to primary school art class. The first thing you need to do is print out some pictures of your favourite Octonauts. Colouring in pages, like these, are good but I went for this for Captain Barnacles, this for Kwazii, and this for Peso. Print them out, adjust for the size you want them to be, and get ready to trace.
 Take your sheet of bondaweb, place it directly over the printouts, and trace all the different elements as separate pieces: noses, eyes, stomachs, and so on. Loosely cut these out: don't worry about getting the precise shape as you'll do that once you've fused the bondaweb to the fabric.
 |
| Pattern pieces, printed off google and cut out |
Now, cut out the the printouts so that you have an outline of the body which you can trace onto the fabric (black for Peso, orange for Kwazii, and white for Cptn Barnacles). Don't attach the bondaweb to these pieces yet. Because of all the sewing that you're going to be doing, we'll add the bondaweb at the end. Cut out the body shapes and start positioning the tummies, collars, eyes, noses, boots, and so on onto them. Once they're in place, iron them all on to secure them.
Some tips: you can make Barnacles as two pieces - a white head and a blue body - but I find it easier to cut out a whole white shape and then add the blue on top. Don't attach Peso's feet - add these directly to the blanket. Likewise, don't attach the hats at this point - we'll add them right to the blanket at the end.
Step 2 - Sew sew sew!

Use the silver metallic thread to sew a zipper detail down Barnacles' front, and dark blue thread to give him the detail in his collar. Hand sew a bit of red onto the circle on his belt. Hand stitch some white in the eyes as well, and any other detail you may want to add.

The hats are a bit fiddly. They need a blue circle with a very small white octopus-like shape in them, and blue stripes. To do them, I appliqued a blue circle onto the hat and stitched it on with white, to create the white edge. I cut out an approximate octopus shape from white felt (no fraying!) and hand stitched it on. I then did a very small, tight zizag stitch across the hat in dark blue for the stripes.


 Now's the big moment: attaching your figures to the blanket. Using them as a pattern, trace and cut out a piece of bondaweb, attach it to the back, and fuse. Then position the figures on the fleece as you want them to go. Using a wet tea towel between the iron and the blanket (IMPORTANT! Fleece will melt without it!), fuse your figures onto the blanket then sew around the edges of the bodies, using the appropriate colours.
Step 4: Finishing
I like to applique the name of the future blanket owner onto the bottom, and finish the edges with a blanket stitch. You could leave them as they are (fleece doesn't fray), or use a blanket binding or bias binding if you prefer. You can even make your own binding, if you're feeling ambitious!

You can, of course, add gups, fish, the Octopod...the possibilities are endless! Or, sew them onto a t-shirt or bag instead of a blanket. And you can use the same method for any other little characters your little characters are fond of - I'm going to try a Pingu at some point! Happy sewing...
Subscribe to:
Posts (Atom)