Showing posts with label binding. Show all posts

Wednesday, 1 June 2011

Binding, part 2

A lot of people (okay, three) have asked me about binding so we're returning to that topic for another look, specifically at how to bind a quilt.

Now I've said before and I'll say it again, I'm no expert. But I have now bound 5 quilts, using 3 different methods, and have gone from fearing and loathing the process to actually really enjoying it. What changed me? Well, after quilt 2 1/2, I got fed up and read the instructions. I never do this. But fed up with my messy, time consuming approach, I looked at the chapter on binding in my quilting book and voila, it made sense!

Here's how it works. (For the purpose of illustration, I'm using garish, non-matching colours. Don't worry. This project was straight for the bin and not an indication of my new creative direction!)

Step 1: attach your binding

See the previous tutorial for instructions on how to make binding. Assuming you've already got yours, line up the rough edges with the edge of your quilt. You're doing this on the top side of your quilt, so that top part will be machine sewn, and the back finished by hand.

With the edges lined up (pin if desired), sew the binding to the quilt. Don't start at a corner, and stop before you get to the corners - that's the next step!
Binding partially attached

 Step 2: Corners

When you get about 1 inch away from the corner, stop stitching and take your needle out. Fold the binding up and off your quilt, to make a triangle as shown in photo A. Then, fold the binding straight back down, along the edge of the next side of your quilt (photo B). Put your needle into the top corner and continue sewing from there (photo C), until you reach your next corner - and repeat!
A

B

C
When you fold the binding over, it should look like this.

Step 3: Finishing by hand

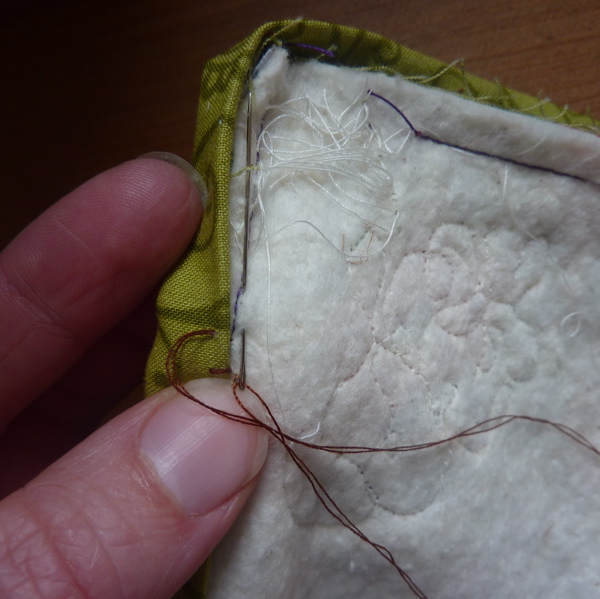
You're going to use what's apparently called an applique stitch. It's probably easier to let the photos do the talking, but basically you start by poking the needle up through the binding, and then into the back of the quilt. Move the needle along a bit under the back, then pop it up and through the binding again. Re-insert your needle into the hole you made coming up, and move it along again. And repeat.

That makes almost no sense when I read it back, but basically if you were to bisect train tracks and keep just one half, that's what you want to sew.

Have a look at the photos. That might make it clearer.
Step 1: poke your needle through the binding

Step 2: move your needle back through the backing of your quilt, and along parallel to the edge of your binding.

Step 3: bring your needle back up to the surface

Step 3 again

Step 4: loop back up through the binding, and down through the same hole you came up, to make a backwards L shape

Step 5: continue along your quilt, taking tiny stitches into the edge of the binding


Your finished binding should look like this from the good side!

No idea if that helped or made things worse, but any questions please ask. Good luck!

Wednesday, 4 May 2011

ABCs of sewing: B is for Binding


Binding is another one of those things that used to scare me, so I avoided it. However, a few months ago I made a quilt and unlike my other quilting attempts where I cheated and did the binding on a sewing machine (more on this later), this one I wanted to do properly. A quilting friend showed me what to do and surprise, it actually wasn't that scary at all. And now I use it ALL the time. Like this skirt. I wanted to add a touch of colour, so instead of hemming it I put binding top and bottom. Et voila!


I use binding on the edges of necks and sleeves, along the top of a cloth bag, around the edge of a cushion, and of course on a quilt.  There are different ways to do it, but here is mine.

You will need:
- strip of fabric, 2 inches wide and as long as you need it. If you can't get the required length in one continuous piece, don't worry. Just cut as many pieces as you need to get there. (To make your life easier, you may well want to use a rotary cutter and mat, or at least a good ruler and a fabric pen - the kind that fades within 24 hours - to mark your lines. You do want to be quite precise here.)
- sewing machine and iron


Step 1: joining pieces

If you don't have one single piece of fabric that is long enough for your purposes, you will need to join pieces together. You do this by placing two pieces of fabric right side down so that their corners form a right angle. 

You then sew across this angle from the bottom left point to the top right point


Open the strip out and you should have joined the two pieces with what looks like a diagonal seam.


 Trim the back, and press it flat. Join as many pieces as you need, but make sure that all the seams are on the same side. (I say this from experience: when I was making this piece, I had to tear out four sections which I'd sewed together back to front. Oops.)


Step 2: Ironing

Now that you've got your very long length, you need to fold it in half length-wise and press it. You should now have a very long, 1 inch tall strip.


Step 3: Attaching the binding

Now these pictures show the binding going onto a quilt, but the premise is the same no matter what you're attaching it to. You want to lay the binding on top of the good side of your quilt/garment/whatever so that the rough edges line up. You're then going to sew the binding on, following along the edge, as shown:


Step 4: Finishing


Now fold the binding around so that it covers all the rough edges and ends up on the back of your quilt/garment/whatever. If you're making a quilt, you'll probably want to take time and finish the other edge by hand using as neat and hidden stitches as possible (see below).

However, if this is just for a skirt or something that isn't going to be closely inspected from both sides, I'm all for just whipping it on with a machine. Unless you're very careful, the stitches will probably show a bit but I don't mind. If you're doing it by machine, fold the binding under and then sew through all the layers, from the top, positioning your needle in the groove where you joined the binding on. The stitches will show on the other side, but shouldn't be too visible from the top. You can see the finished effect on that skirt - the wrong side clearly shows the pink stitching, but the right side looks pretty good!


There you go. A rough guide to binding. Sometime I will show you the very easy, very cheating way to bind a quilt by machine - but that's enough about binding for now.