Friday, 24 June 2011

Octonauts Blanket Tutorial


We're back to the Octonauts. I confess, I'm being a bit of a blog stats whore here, because when I look at my all time stats counter (I am obsessed with my blog stats), over a quarter of those who have flicked over here, or found me from a search engine, have done so because of the stuffed Peso tutorial. I'm also part of the Octonauts community on facebook, and I've seen the amazing efforts that parents have gone to in order to fill their children's desires for all things Captain Barnacles (seriously - someone painted an amazing mural, another made a whole set of Octonauts out of toilet paper rolls, and you should see the birthday cakes!). I feel it's time I came in with a serious contender.

So we have here the Octonauts blanket. Designed for my son's friend's 5th birthday, and now in the process of being replicated for both son and daughter who have, in their own ways, demanded one each. (He asks incessantly if it's finished yet, and she grabs the already completed one and lies on it while stroking Captain Barnacles' face.)


The process, for a change, involves applique. It's a bit time consuming, but certainly can be broken into nappable chunks. I can do one character per nap, and then another nap to sew them onto the blanket. Finish the edges of the blanket in one final nap, and this is probably 5 days worth of work.

You will need:

  • Bondaweb, or an equivalent iron-on applique transfer material
  • an iron
  • a sewing machine
  • fleece (I buy 1 metre of 150cm width and cut it in half, so I get two blankets for £6.99/metre)
  • fabric in the following colours: black, white, light blue, medium blue, dark blue, orange, yellow, grey (tiny bit), pink (tiny bit)
  • thread to match the above colours, plus some red and metallic silver 
  • Fabric Colours
  • a printer, access to a printer, or good drawing skills

A note on fabrics: I use a mixture of cotton and felt. I go for felt for the smaller pieces, which I have to sew on by hand, as it doesn't fray. You could use all felt, but it gets quite thick as you're dealing with multiple layers.


Step 1: Print, trace, cut


Ah, the things we learned in school really were useful. This first step is all about a return to primary school art class. The first thing you need to do is print out some pictures of your favourite Octonauts. Colouring in pages, like these, are good but I went for this for Captain Barnaclesthis for Kwazii, and this for Peso. Print them out, adjust for the size you want them to be, and get ready to trace.

Take your sheet of bondaweb, place it directly over the printouts, and trace all the different elements as separate pieces: noses, eyes, stomachs, and so on. Loosely cut these out: don't worry about getting the precise shape as you'll do that once you've fused the bondaweb to the fabric.
Pattern pieces, printed off google and cut out

Now, cut out the the printouts so that you have an outline of the body which you can trace onto the fabric (black for Peso, orange for Kwazii, and white for Cptn Barnacles). Don't attach the bondaweb to these pieces yet. Because of all the sewing that you're going to be doing, we'll add the bondaweb at the end. Cut out the body shapes and start positioning the tummies, collars, eyes, noses, boots, and so on onto them. Once they're in place, iron them all on to secure them.

Some tips: you can make Barnacles as two pieces - a white head and a blue body - but I find it easier to cut out a whole white shape and then add the blue on top. Don't attach Peso's feet - add these directly to the blanket. Likewise, don't attach the hats at this point - we'll add them right to the blanket at the end.

Step 2 - Sew sew sew!

Once all your pieces are attached, fused, and ready to go it's time to start to applique. You're not attaching them onto the blanket at this point, but just attaching the different layers to the body. I used hand sewing for the eyes and Peso's beak but machine sewed the rest. I find it easier to do all the fiddly sewing bits before it's attached to the blanket, but feel free to do it all at that stage if you prefer. Doing it this way, though, means fewer threads showing through onto the back of your blanket.


Use the silver metallic thread to sew a zipper detail down Barnacles' front, and dark blue thread to give him the detail in his collar. Hand sew a bit of red onto the circle on his belt. Hand stitch some white in the eyes as well, and any other detail you may want to add.

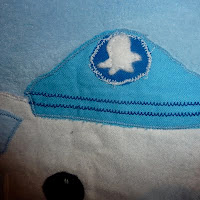
The hats are a bit fiddly. They need a blue circle with a very small white octopus-like shape in them, and blue stripes. To do them, I appliqued a blue circle onto the hat and stitched it on with white, to create the white edge. I cut out an approximate octopus shape from white felt (no fraying!) and hand stitched it on. I then did a very small, tight zizag stitch across the hat in dark blue for the stripes.


Step 3: Attaching

Now's the big moment: attaching your figures to the blanket. Using them as a pattern, trace and cut out a piece of bondaweb, attach it to the back, and fuse. Then position the figures on the fleece as you want them to go. Using a wet tea towel between the iron and the blanket (IMPORTANT! Fleece will melt without it!), fuse your figures onto the blanket then sew around the edges of the bodies, using the appropriate colours.

Step 4: Finishing

I like to applique the name of the future blanket owner onto the bottom, and finish the edges with a blanket stitch. You could leave them as they are (fleece doesn't fray), or use a blanket binding or bias binding if you prefer. You can even make your own binding, if you're feeling ambitious!

You can, of course, add gups, fish, the Octopod...the possibilities are endless! Or, sew them onto a t-shirt or bag instead of a blanket. And you can use the same method for any other little characters your little characters are fond of - I'm going to try a Pingu at some point! Happy sewing...

Thursday, 23 June 2011

Bunting

Bunting is everywhere just now, and when you see how easy it is to make you'll understand why. There are lots of different methods you can use for bunting, and I'll give you some cheats at the end, but here is my favourite way. Takes a bit more time, but it's still definitely possible to make a metre or so of bunting in one nap.


You will need:

  • fabric. Cotton works best. You probably want at least two complimentary colours or patterns, and I would say no more than four but really, go mad. Anything goes. How much depends on how long you want your bunting and how big you want your triangles, but I tend to buy 20cm of whatever width it is and start with that
  • satin bias tape, the length that you want your binding to be
  • thread to match your bias tape
  • an iron
  • a sewing machine
  • rotary cutter, cutting mat, and ruler - not essential, but very useful
Step 1: draft your pattern (ie. draw a triangle)

Using newspaper or just a sheet of A4, draw a triangle. I like mine to be no more than 7-8 inches across the top, and about 8 inches up to the point. Experiment, though. For Christmas, I made strings of tiny triangles, about 4 inches high, in green and red gingham to hang on the Christmas tree. You could also try combining big and small triangles.

Step 2: cutting out

Fold your fabric in half, position on your cutting mat (if you're using one), and cut out your triangles! As a rough guide, I would use between 9 and 12 triangles in 1.5 metres of bunting so you'll want to cut out about a dozen pairs. You can mix and match patterns to make triangles that have different fronts and backs, or just stick to one pattern per pair.


Step 3: sewing the triangles

Machine sew your pairs down the two long sides, leaving the bottom edge of the triangle open. Snip the tip so that you get a nice, neat point. Turn them inside out, and press them. Once they're all sewn, I tend to line them up on my cutting mat and trim the bottoms (and by that, I mean the bottoms that will actually be the tops when they are hung) so that they're all even.


Step 4: assembly!

Set your machine to a zigzag stitch. Leaving a length of bias tape at either end to tie your bunting, begin positioning your triangles inside the bias tape. You can put them right next to each other, leave a gap, or alternate with smaller triangles. Pin them in place.

Once they are all pinned in, slowly start sewing the bias tape closed, with the triangles stuck inside (like the filling in a bias tape sandwich). Make sure you sew the complete length of the bias tape, so that you have nice ties at either end.


And, you're done! Hang and enjoy! 

Cheats: to make this even easier, try some of the follow. Instead of sewing the triangles together, cut them out with pinking shears - either one layer or two - and attach them to the bias tape as they are. Sew your triangles directly onto a piece of ribbon rather than bias tape. Cut triangles out of felt - they won't fray, and they don't require any sewing!

My bunting bedecked craft table, July 2010

Additions: try adding bells between the triangles for festive bunting, or have hanging shapes or pom poms. Applique letters or shapes onto the triangles. Make your own binding in a complimentary fabric. Open it up and fold the raw edges in towards the centre fold. Press again, and use instead of bias tape.
Bunting themed quilt, May 2011

Wednesday, 22 June 2011

The Joys of Applique

Honestly, I don't know what I did before I appliqued. To think I spent a whole year of sewing without it! Here's what I've been up to this week. Both presents have now been handed over, and are thus safe to share.

For a beautiful wee girl, what better than name bunting? I actually really like this, and it may become my standard new baby gift. It can hang above the cot when baby is born, and make appearances for birthdays and special occasions throughout baby's childhood. If you're expecting, expect to get one of these from me!


And for another special baby who is being baptised this weekend in Hungary, what better than a name blanket? This was done in very soft, creamy coloured polar fleece. I finished the edges with a blanket stitch using pale green yarn, and attached the flowers, leaves and letters with bondaweb (using a damp tea towel, as fleece melts under an iron!). If you don't know how to blanket stitch (I didn't), then check out this video, complete with soothing music. It's easy as pie.

I then stitched the flowers and letters in white, but used green for the leaves. It does show through on the back, but it was so much better on the front that it's worth it.


A bit time consuming, but definitely not tricky. And I hope they make their special little owners smile.

Monday, 20 June 2011

ABCs of Sewing: C is for Cutting out

Cutting out is probably my least favourite bit of sewing. It's not because of the absolute terror I feel every time I cut into a crisp, pristine length of fabric. No, my hatred lies elsewhere.

As my mother says, sewing is 90% cutting out and pinning, and only 10% actual sewing. The sewing bit, I like. The other bits, I endure. The reason for my loathing? It probably has to do with the fact that cutting out requires precision and care. To get the best results, you want to be consistent and careful, making little marks to help line up the pieces and ensuring the pattern doesn't move. I am not good at this.

It is worth being good at this, though, as dressmaking and pattern-following kind of relies on it. Too often when I work from a pattern I have to fudge or fidget pieces to make them match up, whereas if I'd just taken more care when cutting I'd have had a much simpler job.

I dream of a laser cutter, or barring that a small nimble-fingered assistant who delivers stacks of neatly cut, folded and labelled pattern pieces, complete with their delicate parchment pattern piece pinned on top. Until then, here's what I've learned about cutting out. As with many things in my sewing room, do as I say, not as I do.

1. To pin, or not to pin? Apparently, the more pins the better. My mother pins like mad. But I find the more I pin, the more I shift the pattern pieces and mess myself up. I create puckers and folds and tears where there needn't be. (And you can read that 'tears' both as rends in the garment, and weeping. They both happen.) My preferred method, where possible, is to simply weight the pattern down. An old seamstress friend would use heavy, smooth rocks instead of pins - something I will definitely do in my (imaginary) sewing room!

2. Choose your surface wisely. Again, I preach from experience. I have cut through rugs, papers, and layers of fabric that I didn't mean to cut through. The best surface is a big table, if you have one. I don't, so I use the floor. But I should really remove the children's toys before I use the floor. And maybe sweep up, too. Nice as it is to pick up your fabric covered in toast and apple juice...

3. Different projects call for different methods. (And levels of care, for the matter.) For some things, you can get away with an extra inch here or there. Others, you can't. For example, I made a child's sun hat a few weeks back. Only I ignored the precision required in the measurements and now the child's sun hat fits me, and not my 18 month old. Oops. But as far as methods go:
  • Applique: When it comes to appliques, you have to be quite careful with your cutting. I find the easiest way to get a neat shape is as follows. Trace your shape directly onto your Bond-a-web (make sure you flip it over if it has a right and a wrong way, like letters!). Cut loosely around the shape and then iron it onto the fabric. Once it is fused on, cut it out along the lines you traced for a neat, sharp shape.
  • For quilting, a rotary cutter and board are your friends. You will need a good ruler as well, and the cost does add up. Look on the internet for the best deals. I use an Olfa 45mm rotary cutter, a small omni mat (although if I could do it again, I'd probably buy a bigger one), and a 6x18 inch ruler. Once you've got your rotary cutter, though, you'll never look back. You can cut through several layers of fabric at once, quickly, and with great precision. Great for cutting squares, strips, and triangles for bunting!
4. Choose your tools well. You will absolutely need a good pair of scissors. Don't use them for anything but sewing. Buy good pins (with appealing colours on top!) and a pin cushion to keep them in. My mum had a great one that she could wear on her wrist - I've not found one but I'm on the hunt!

I'm not saying cutting out will ever be fun, but hopefully this will help. And if nothing else, it might serve as a cautionary tale (see photo).
    The sun hat, meant to be for a toddler. Oops.

Top Secret Bloggables

I've been working away on various things, and it's killing me keeping them quiet. They're all presents for various people, and so can't be revealed just yet. But soon, soon!

Coming up soon, then: a quilt in an hour (yes, really), an Octonauts blanket, and fleece applique blankets. Can't wait to show you what I've been up to!

Saturday, 11 June 2011

Happy happy tidy tidy!

Oh what happiness! My 'sewing room' has, for the past year, been our dining room table. Over time, my stuff has sprawled, covering not only the table but also the seats of all four chairs. We've been eating on our knees in front of the television. There is no room to paint, or play playdough, or really do any of the things I should be doing with the wee ones when I'm not neglecting them to make a quilt, or trousers, or bunting.

But today, all that changed. A quick trip to Lakeland Plastics while they napped resulted in two purchases: a Chubby trolley (I find it hard to resist things with 'chubby' in the name) and a set of 3 plastic shoe boxes. And now, everything is lovely and tidy and neatly tucked away!


Does this mean I can go buy more stuff now?

Sunday, 5 June 2011

Tuscan Chestnut Flour Cake

Sometimes, it's the kitchen rather than the sewing machine that calls to me. But combining kitchen projects and nap times can be dangerous. An unexpectedly early waking can mean that your sewing project doesn't get hemmed, or you have to sew the buttons on later, but rising bread, baking cakes, and simmering jam just won't wait. So if I undertake a cooking project in a naptime, I have to be quite sure that I can be in and out of the kitchen in no time at all.


Enter this rather bizarre chestnut flour cake. I was given a bag of chestnut flour by my mother-in-law, who didn't know what to do with it but thought 'the computer' might be able to tell me how it should be used. And lo, it did! After some research, I found this recipe for what looks to be an 'authentic' Tuscan 'poor man's' cake. It is apparently made from ingredients that were all seasonal and local to Tuscany, and would be an inexpensive meal.

A few notes on the recipe. The batter is thin. Very thin. It looks more like a pancake batter than a cake batter of any kind. But have faith, and it will miraculously turn cake like. When I make this again, I will probably put a bit less water in, but it did work fine. You need to do some serious whisking to get the lumps out, too. Because of the thinness of the batter, I actually baked it for about 20 minutes before drizzling the olive oil on the top, as I thought it would just sink right into the cake otherwise. Maybe that is supposed to happen?

And finally, the taste. When I first tried it, I couldn't decide if I liked it or not. If you're after a Victoria sponge, this is NOT your cake. It is a bit chewy, a bit thick, a bit strange... But after a few bites I was hooked. It's an almost savoury dessert, quite light, and I think very good. Not bad for almost no ingredients, fat, sugar, or labour!

TUSCAN CHESTNUT FLOUR CAKE

3 Tbsp raisins
1/2 lb chestnut flour
2 1/2 Tbsp olive oil, plus some to drizzle
pinch of salt
4 tsp sugar
2 cups cold water
3 Tbsp pine nuts
a few springs of rosemary (or a teaspoon of the dried stuff)

Soak the raisins in some warm water for a few minutes, then pat dry. In a bowl, mix the chestnut flour, oil, salt, sugar, and water. Mix thoroughly, getting rid of all the bumps. Add the raisins and the pine nuts into the batter and pour into an oiled 8 or 9 inch pan. (The cake won't rise, so it doesn't have to be a deep pan.) Sprinkle with the rosemary and drizzle with olive oil (or add the olive oil after a bit of baking).

Bake at 200C for an hour, or until the surface looks like it's covered in little cracks. Cool, turn out from the pan, and enjoy!

Wednesday, 1 June 2011

What I've Been Up To

You may have noticed a silence on the blog front. That's because I've been working on a project that is completely NOT in the ethos of Sew Bored. This project took me a full week to finish! And so, I am not blogging about it in a tutorial way, but just in a 'here's what I've been up to' way.


I was recently pointed to this amazing blog, and have been in absolute awe ever since. Her stuff is SO beautiful, and so lovely, and she makes it look easy! So when I found this tutorial, I had to give it a try.


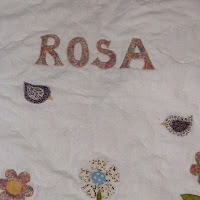
I've been wanting to make a blanket for Rosa's bed, and I had a lovely piece of white flannel going spare, and so the project went from pillow to quilt. Essential to Don't Look Now!'s style is free motion quilting, which I've never tried, but I went and bought a free motion foot for my sewing machine and thought I'd give it a bash.


Basically...it didn't go too well. While Don't Look Now! lady uses free-motion stitching along the edge of her appliques...I couldn't. I ended up just doing my usual zig-zag stitch, which worked well enough. The real problem came with the actual quilting. Although by this point I had got a bit more practice (and am actually halfway through free-motion quilting another Top Secret UnBloggable project), I couldn't face trying it on this one too. So I quilted a sun, and some clouds, and some stars and squiggles and so on just to hold everything in place.

 I LOVE the quilt top, but I am not a fan of my quilting. Still, for a practice project I'm fairly pleased, and I've got some ideas to use for next time. And if anyone knows of any classes in free motion quilting...Please let me know!

Binding, part 2

A lot of people (okay, three) have asked me about binding so we're returning to that topic for another look, specifically at how to bind a quilt.

Now I've said before and I'll say it again, I'm no expert. But I have now bound 5 quilts, using 3 different methods, and have gone from fearing and loathing the process to actually really enjoying it. What changed me? Well, after quilt 2 1/2, I got fed up and read the instructions. I never do this. But fed up with my messy, time consuming approach, I looked at the chapter on binding in my quilting book and voila, it made sense!

Here's how it works. (For the purpose of illustration, I'm using garish, non-matching colours. Don't worry. This project was straight for the bin and not an indication of my new creative direction!)

Step 1: attach your binding

See the previous tutorial for instructions on how to make binding. Assuming you've already got yours, line up the rough edges with the edge of your quilt. You're doing this on the top side of your quilt, so that top part will be machine sewn, and the back finished by hand.

With the edges lined up (pin if desired), sew the binding to the quilt. Don't start at a corner, and stop before you get to the corners - that's the next step!
Binding partially attached

 Step 2: Corners

When you get about 1 inch away from the corner, stop stitching and take your needle out. Fold the binding up and off your quilt, to make a triangle as shown in photo A. Then, fold the binding straight back down, along the edge of the next side of your quilt (photo B). Put your needle into the top corner and continue sewing from there (photo C), until you reach your next corner - and repeat!
A

B

C
When you fold the binding over, it should look like this.

Step 3: Finishing by hand

You're going to use what's apparently called an applique stitch. It's probably easier to let the photos do the talking, but basically you start by poking the needle up through the binding, and then into the back of the quilt. Move the needle along a bit under the back, then pop it up and through the binding again. Re-insert your needle into the hole you made coming up, and move it along again. And repeat.

That makes almost no sense when I read it back, but basically if you were to bisect train tracks and keep just one half, that's what you want to sew.

Have a look at the photos. That might make it clearer.
Step 1: poke your needle through the binding

Step 2: move your needle back through the backing of your quilt, and along parallel to the edge of your binding.

Step 3: bring your needle back up to the surface

Step 3 again

Step 4: loop back up through the binding, and down through the same hole you came up, to make a backwards L shape

Step 5: continue along your quilt, taking tiny stitches into the edge of the binding


Your finished binding should look like this from the good side!

No idea if that helped or made things worse, but any questions please ask. Good luck!

Lavender Pillows

A whopping 8 people voted that they wanted to learn how to make lavender pillows - so here you go! There really is nothing easier to make, and not only do they smell lovely, they keeps moths away too (a big issue in my flat, for some reason!) What can make these special is any decorating, or as I like to call it, garnishing that you might do. I like to sew on little ribbon roses, or fun buttons, and if I have the time I'll usually embroider one of them the initial of the person who's getting them.


I like to have some on hand, half finished, so that I can stuff them and personalise as needed. From start to finish, you can easily make three in a nap time. These ones are just for me, so they're pretty plain, and they're made from old pillow cases bought in a charity shop.

Incidentally, this is the exact same method you can use for making little bean bags. Just stuff with dried beans or grains instead of lavender, and I'd suggest stitching round your seams twice for extra strength.

You will need:
-fabric. Nothing too thick, so that the lavender smell can easily escape. I like to use old pillowcases and scraps of cotton. For mine, I tend to cut 5 or 6 inch squares. To make three cushions, you'll need 6 6 inch squares in complimenting or contrasting fabrics.
-lavender. I buy mine in huge amounts on eBay and it's quite reasonable. I think I paid £12 for a kilo and that is all the lavender I'll ever need in my life.
-thread
-garnishes (ribbon, flowers, buttons, iron-on transfers, appliques, beads, sequins, lace - whatever takes your fancy!)
-sewing machine and iron
-needle for hand sewing

Step 1: Cutting Out

Cut out two squares (or any shape really; the world's your oyster!) from the fabric of your choice. My squares are 6 inches. I make these in sets of three, so I've got 6 squares in total.


Step 2: Sew

Put your squares right side together, and sew round the edge, leaving a gap of a few inches on one of the sides.


I prefer to leave my gap in the middle of a side, and sew round the corners. It makes it easier to get a nice, sharp corner.


Step 3: Trim and turn

Snip off the edge of your corners (again, this helps get a nice sharp point, and turn right side out. Press your pillows nice and flat, and make sure to tuck in the edges of the gap you left.


Step 4: Stuff and Sew

Fill your pillows with lavender (or beans, if you're going that route). Then sew up the gap by hand, using a whip stitch. Or, if you're pressed for time/not really bothered about stitches showing, just sew over your gap on your machine. They're just going in a drawer, after all!

Stitching the gap closed

And, you're finished! Now the beauty of these is in the presentation so take some time with it. I like to tie mine in ribbon, and sew a button on to secure it. Tuck a feather in, or pin it shut with a vintage brooch or lapel badge. When the smell of lavender starts to fade, just give the pillows a good scrunch and that should revive them. Enjoy!